Tuesday 28 August 2012

Bonjour Mini Album

Hello bloggers and fellow Scrap-addicts!

Firstly, I will say that this blog is loooong over due since this project was a gift I made for 2 of my close friends for Christmas 2011... Well, better late than never, right?? LOL

I created these albums using a mixture of papers that co-ordinated. I used Kaiser Craft-Bonjour & some Chapter One, Websters Pages-Country Estate, Bo-Bunny-Gabrielle(pockets), Fancy Pants-Road Show, American Crafts-Pow Glitter.

I used Maya Road 6x6 chipboard album and Tim Holtz Distress Stain to change the color of the album.


Cover
The frame in the top left corner is a chipboard frame by Tattered Angels, I stained it with Tim Holtz distress Stain, I used my black soot ink pad to rub across the frame to bring out the embossing and then I added a small amount of gold embossing powder to the frame to add more texture & dazzle. I fussy cut out the butterflies and used 3D foam squares to 'pop' them off the page. The ribbons are by Maya Road.

Inside Cover & Page 1
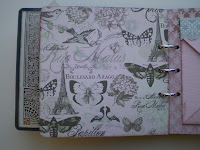
The inside cover was created by cutting and piecing the gorgeous metallic border from a 12x12 sheet to fit the inside of the 6x6 album. Most of he album pages were created using the 6 1/2 x 6 1/2 paper pad from the Bonjour line. I made the mistake of overlooking the fact that the paper pack was 6 1/2 x 6 1/2 and the album I purchased was only a 6x6... So, I had to trim all the pages to fit the album. Again the butterflies were fussy cut from the paper, I also used a ticket corner punch on the photo mat.


 Page 2&3
Page 2, the background paper was embossed/glazed so I used several colors of coordinating inks blended together to bring out the pattern in the paper. I used a flower punch to create the flowers, fussy cut the butterflies & bird. The strip was a Bazzil border that I inked with a brown ink and I added a Websters sparkler. Page 3, I used the Bo-Bunny journaling tags from Gabrielle to create the pocket and added the ruffled ribbon.


 Page 4&5
Page 4, I used a pocket by Maya Road and sprayed it with a mixture of sprays in coordinating colors. The borders on the top and bottom of the pocket are borders by Bazzil that I stained aqua blue. I used Sook Wang tape in 1/4" around the outside edge and glittered the tape with microfine silver glitter by Glamour Glitter. Page 5, the crown & butterfly were fussy cut from the paper and the silver flourish is by Jolees.


 Page 6&7
Page 6, I used Fancy Pants Road Show to create the flap. The dress form is cut out of grunge board using the Tim Holtz mini die cut, I stained it with black soot Distress Stain. I also cut the dress out of paper and cut out only the dress part and added the ribbon. Corner element & butterfly are fussy cut out and 3D popped. Page 7, I used the Bo-Bunny journaling tags from Gabrielle to create the pocket, corner element was fussy cut out and I added a bling gem by Prima.


Page 8&9
Page 9, I created the pocket from a piece of pink cardstock, I wanted it to look like an envelope so I made the flaps triangular with rounded corners and used a small piece of velcro for the closure. The flowers and butterfly are fussy cut. The silver lace at the top of the pocket is fussy cut from S.E.I. Couture.


Page 10&11
Page 10, I used Websters Pages to create this 'door flap'. The bird cage is a Tim Holtz mini die cut out of grunge board and embossed with silver. The closure sliver brads are from CTMH and the bird & butterfly were fussy cut. Page 11, I used another Bo-Bunny journaling tag from Gabrielle to create the pocket, flowers are punched out of the papers, crumpled and layered.


 Page 12&13
Page 12, again I used the Bo-Bunny journaling tags from Gabrielle to create the pocket. Page 13, I used another silver flourish by Jolees and fussy cut butterflies. The ribbon is by Maya Road and I used a Martha Stewart punched out of sliver cardstock across the photo mat.


 Page 14&15
Page 15, I created a different style of envelope pocket with a velcro closure. I added the inside from the Tattered Angels chipboard frame from the cover, I used Tim Holtz Distress Stains & Inks and I embossed the 'C' with sliver embossing powder. I used the 'C' on this album because it was a gift for my good friend Caroll. I also used a corner punch with the silver Pow glitter cardstock to embellish the pocket along with a bling center by Prima.


Page 16 & Back Inside Cover
Page 16, the butterflies are fussy cut out and I used the same glitter paper and punch for the corner accent as  the pocket from the previous page. The design on this page took up most of the space so the mat is small. The Back Inside Cover was created the same as the Front Inside Cover by cutting and piecing the metallic border from a 12x12 sheet to fit the inside of the 6x6 album.


This project was a lot of fun to create and the best part was giving them to friends who appreciated all that went into creating them. I didn't make tracers of the pockets I designed for this album, in hind-sight I wish I had for future use. Anyway, I love the creating process, thanks so much for stopping by and sharing my passion for Scrapbooking!


Saturday 11 August 2012

Finding the right Pictures

Hello fellow bloggers & scrapbookers, I am sure you all have layouts designed waiting for those perfect pictures, I know I do... I was busy digging through all of my pictures to find the right ones for these layouts I had already completed while working at Scrap-A-Lot and I realised why it is so important to have your picture BEFORE you tack your layout together! What a challenge! It took me hours and I still have so much more to do. Some of my pictures were perfect but they were taken portrait when I needed landscape or vice versa... But, the worst part was trying to "un-glue" the design to put the pictures on the mats! Thank goodness for un-do it is honestly a scrapbooking necessity! If you have never used it, un-do is a liquid product that dissolves adhesive without damaging your layout or your photos. It is Awesome!
I bought my un-do at Scrap-A-Lot, you can find it at most local scrapbook stores or even online.

After several hours fighting with stacks of pictures and un-gluing the foam squares and adhesive glued down over top of my photo mats(not very smart in hind-sight) Here are some of the layouts I managed to find pictures for, these were designs I taught as classes while I was working at Scrap-A-Lot.

Gypsy Rose
For this layout I used a beautiful paper line by Kaisercraft , I love the color combination and the design of the paper.  I did a lot of fussy cutting and used Prima flowers and bling to accent the layout.  The larger individual gems were from a bulk package of multi-colored gems.

Enchanted Garden
Most of this beautiful paper is by Prima, I also used Fancy Pants(the pink patterned paper used to mat the photos & in the background) I carefully cut out only the butterflies from the paper using an exacto knife leaving the openings in the background. I used a Martha Stewart punch to create the scalloped polka-dot edge on the pink patterned paper. The flowers are 'Color Me Crazy' flowers with glitter by Petaloo, sprayed with a combination of Maya Road Mists and Tattered Angels Glimmer mists. The ribbon is May Arts and Fancy Pants. The large butterflies are Prima. I used glossy accents to adhere the pink & purple glass beads by Martha Stewart onto the swirls and flower centers. Finally I used Stickles around the edges of each butterfly as well as the butterfly openings in the background to add a more whimsical feel to the layout.

L'Amour
This layout was designed with a gorgeous paper line as well as wood accents by Kaisercraft. The blue hydrangea flowers are by Petaloo and I used a Martha Stewart corner & edge punch to frame the photos.  I used Tim Holtz Ranger white picket fence distress stain on the wooden bird cage to stain it white. There is a crazy amount of fussy cutting and dimension on this layout.

Morning's Frost
I created this snowy winter design using SEI papers.  The snowflakes and trees are fussy cut from the paper, I layered the trees and used dimension foam to create the hilly scene. I used a specialty metallic silver paper to mat the photos. I added some clear gems, a stick pin and fancy button. The sheer navy ribbon is by May Arts. The owl is a Prima stamp, using silver embossing powder on a shimmery white cardstock. I then used my stylus tool to shade in some blue ink onto the back of the owl.

Spring in Bloom
Here I used Prima papers, I fussy cut out the flowers from the paper using an exacto knife and used 3-D foam squares to add dimension to them.  The border and corner punches I used are by Martha Stewart. The lace ribbon is by Prima, it was white and I used Tattered Angels glimmer mists to make it multi-colored.  The flower centers are by Websters Pages. The 3 chipboard frames in the top right corner are Tattered Angels, I used several colors of Tattered Angels Glimmer Glazes to color them to match the layout. Once they were dry I took my brown ink and ran it across the top of the frames to bring out the embossed raised edges. The paper flowers are also by Prima.

Butterfly Kisses
This beautiful glittered flourish paper was simply inspiring. I fussy cut out the flourishes and used 3-D foam to pop them off the page. The glittered paper butterflies were cut from paper by DCWV, the large epoxy butterflies are by Prima. The shimmery metallic lacy ribbons are by May Arts. I made slits in the ribbon using an exacto knife and wove a contrasting ribbon through the slits. The brown gems at the bottom are adhesive bling by Zva.

Country Garden
These papers by Websters Pages are stunning. The pink/cream script in the background is by Graphic 45. I fussy cut out groups of the flowers and gazebo. The lace border punch is Martha Stewart. I cut the bird & cage out of grungeboard using a Tim Holtz die cut. The bird is embossed with gold, the cage is stained with Ranger distress stain then I used crackle accents over the entire cage. I used a Sizzix die to cut the pink flowers out of the paper and then layered them to create the flowers and used gold embossing powder on the edges of the flowers.  The stamps are by Pink Paislee, I used gold embossing power on cream cardstock and fussy cut out the designs. The gold ribbon on the top & bottom of the page are by May Arts.

I hope you enjoyed looking at and reading about some of my designs as much as I enjoyed creating them.  

Thanks for stopping by, happy scrappin' !!!

Saturday 7 July 2012

Far too long since my last post....

Hello my fellow scrapbooker's, it has been a year since my last post... I know many of you have been checking and have been disappointed to find nothing new posted. My sad neglected blog has been sitting here with no new layout designs for far too long.... I have updated the section "Designs by Michelle" with 42 new images of kits I created while working at Scrap-A-Lot.  I will soon update it with more class designs as well as some store samples I did, projects and more! I also have an exciting special project on the go that I will post up very soon!!


Here are a few designs you will find under "Designs by Michelle"


On a more sad note, I am very sorry to say Scrap-A-Lot has closed it's doors. I really enjoyed working and playing there and the friendships I made.  One thing we can all say is that no matter what we do, scrapbooking will always bring us together and I look forward to continuing to scrapbook with all my friends, you have all impacted my life in a way I will never forget! Really, this is what it is all about... Capturing the moments and preserving the memories in our lives. I call you my friends but, Scrap-A-Lot was and will remain a part of my family. Love you girls!!!

My Scrap-A-Lot Family

Now that I am all choked up, I will leave you with a painting my daughter Kiara made recently and has hanging on our wall... You just have to love the way a child views the world...


Saturday 20 August 2011

Life's a Beach

Well I just got back from my vacation in Jamaica with my wonderful man Nicolas and I've been busy creating some new pages... I'm not sure which is more exciting, the vacation or scrapbooking all the wonderful memories after my trip! Soooo much fun! Here are the pages I have created so far... we took 330+ pictures so I'll be busy for a while LOL. As always I have added these layouts to my Gallery along with more detailed pictures and descriptions of what I did and what I used on the the pages.

Flowers, bling and of course sprays!

More flowers... Fun technique with alcohol inks, memory glass and seed beads.

Embossed chipboard, glimmer glazes & glams, inking and a new product I just got my hands on called Goosebumps... Very Cool!

Sunday 17 July 2011

Just about a Boy....

I find often that my work gets girly and fru fru since I have 2 delightful little girls to make my pages pretty with loads of bling and flowers I often have a hard time finding great "boy" paper to work with... Well this post is all about My Boy and the fabulous "boy" paper I found for the pictures that my friend and fabulous Photographer Paula took of my son. Thank you Paula! Her business is called Heartland Studio. The Stylin' layout will be on display at Scrap-A-Lot.